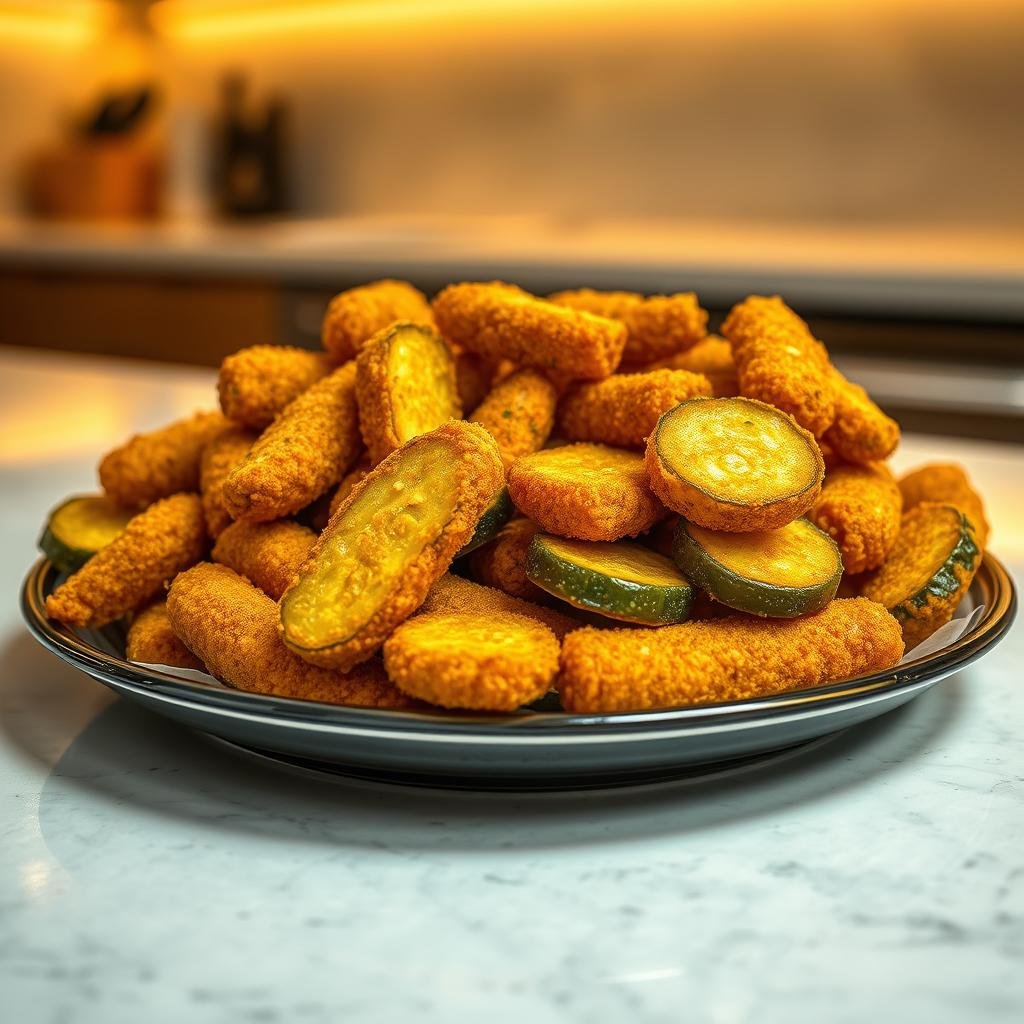
Imagine creating that perfect bar-style snack right in your own kitchen. You can achieve that satisfying crisp without dealing with hot oil splatters. This method transforms a classic favorite into something both delicious and better for you.
The secret lies in modern kitchen technology that circulates heat efficiently. You get that golden exterior and tender interior with significantly less fat. It’s a game-changer for anyone who loves flavorful snacks but wants to cut back on calories.
This approach delivers incredible results in under 30 minutes. You’ll master a technique that works for last-minute gatherings or spontaneous cravings. The final product will surprise you with its authentic texture and taste.
Key Takeaways
- Create restaurant-quality snacks with minimal oil and maximum flavor
- Achieve perfect crispiness without traditional deep frying methods
- Enjoy a healthier version of your favorite bar food at home
- Complete the entire process in less than 30 minutes
- Impress guests with your air frying skills and delicious results
- Reduce cleanup time compared to conventional frying techniques
- Master a versatile recipe perfect for parties and casual snacking
Why You’ll Love These Air Fryer Fried Pickles
You’re about to experience a culinary revelation that combines taste and health in one bite. This modern cooking approach transforms a beloved snack into something extraordinary. The results will surprise even the most skeptical food enthusiasts.
Experience that perfect combination of textures you crave. A crispy golden exterior gives way to a juicy, tangy interior. Each bite delivers satisfaction that keeps you reaching for more.
Enjoy significantly reduced oil content compared to traditional methods. You maintain all the flavor while cutting back on unnecessary fats. It’s a smarter way to indulge in your favorite treats.
Appreciate the quick cooking time of just 5-14 minutes. Your specific model and ingredient thickness determine the exact duration. Either way, you get fantastic results in record time.
Love the minimal cleanup required with this approach. No pots of hot oil or batter splatters to worry about. Your kitchen stays neat while you create something delicious.
Discover how versatile this preparation can be for various dietary needs. Explore keto-friendly and egg-free options with simple adjustments. Everyone can enjoy this tasty treat regardless of preferences.
Enjoy the health benefits of reduced fat content while still indulging. You get that satisfying snack experience without the heavy, greasy feeling. It’s the perfect balance of pleasure and wellness.
This method works beautifully for both casual snacking and impressive party offerings. Your guests will be wowed by your culinary skills. You’ll become known for creating memorable flavor experiences.
The combination of efficiency, health benefits, and incredible taste makes this approach truly special. You’ll find yourself making these golden delights again and again.
The Secret to Perfect Air Fryer Fried Pickles
Mastering this technique requires understanding a few critical steps. These methods separate ordinary results from extraordinary ones. Your attention to detail will reward you with incredible texture.
Begin with proper drying of your ingredients. Use clean kitchen towels or paper products to remove excess moisture. This step ensures your coating adheres perfectly without sliding off.

Arrange your items in a single layer within the cooking basket. Leave adequate space between each piece for optimal circulation. This prevents steaming and promotes even browning.
Never overcrowd your cooking vessel. Hot air needs room to move around each item. Working in batches maintains quality when preparing larger quantities.
Preheating your appliance makes a significant difference. It ensures consistent temperatures from the very beginning. You’ll achieve that beautiful golden color without burning.
Temperature control remains essential throughout the process. Monitor your cooking time carefully for best results. Most recipes require just 5-14 minutes depending on thickness.
These simple techniques transform your final product dramatically. They elevate home cooking to restaurant-quality standards. Your efforts will be noticeable in every bite.
| Common Mistake | Proper Technique | Result Improvement |
|---|---|---|
| Wet ingredients | Thorough drying | Coating adhesion |
| Crowded basket | Single layer spacing | Even crisping |
| No preheating | Proper warm-up | Consistent browning |
| Wrong temperature | Precise heat control | Perfect texture |
| Rushing batches | Patient preparation | Uniform quality |
Following these guidelines guarantees exceptional outcomes every time. Your dedication to proper technique makes all the difference. You’ll create snacks that impress everyone who tries them.
Remember that spacing between items is non-negotiable. It allows the hot air to work its magic properly. This simple step ensures professional-level results.
These methods work for various dietary preferences too. Adjustments can accommodate different needs while maintaining quality. Everyone can enjoy these delicious treats.
Ingredients You’ll Need
Your journey to creating an unforgettable snack starts with thoughtful ingredient choices. Each component plays a vital role in achieving that perfect texture and flavor. Selecting quality items ensures your final result will impress everyone who tries it.

The right combination transforms simple items into something extraordinary. You’ll discover how each element contributes to the overall experience. Thoughtful selection makes the difference between good and exceptional results.
Pickle Selection
Choose between traditional dill pickles or bread and butter varieties. The first option delivers classic tangy flavor that pairs beautifully with coatings. The second choice offers a slightly sweeter profile that many find irresistible.
Pre-cut pickle chips save time and ensure consistent thickness. Alternatively, slice whole spears into coins for custom sizing. Either approach works well depending on your preference and available time.
Quality matters when selecting your base ingredient. Look for firm, crisp specimens that hold their shape during preparation. This ensures your final product maintains structural integrity throughout cooking.
Breading Components
Panko breadcrumbs create the lightest, crispiest coating possible. Their unique texture allows for maximum air circulation during cooking. You’ll achieve that satisfying crunch without heavy, dense breading.
The binding agent options provide flexibility for different dietary needs. Traditional egg wash offers reliable adhesion and golden coloring. For egg-free alternatives, combine flour, cornstarch, water, and hot sauce.
This mixture creates a sturdy foundation for your breadcrumbs. It ensures even coverage and prevents coating separation. Your final product will have consistent texture throughout each piece.
Seasoning and Oil
Seasoning choices range from simple to complex based on your preferences. Basic salt and pepper allow the natural pickle flavor to shine through. More adventurous blends might include garlic, paprika, or additional dill.
The right oil application ensures perfect crisping without excess grease. Extra-virgin olive oil adds subtle flavor notes while promoting browning. Cooking spray offers convenience and even distribution.
“The quality of your ingredients directly influences the quality of your results. Don’t compromise on the foundation of your creation.”
| Ingredient Type | Recommended Choices | Alternative Options | Key Benefit |
|---|---|---|---|
| Base Item | Dill pickle coins | Bread and butter chips | Flavor foundation |
| Breading | Panko breadcrumbs | Regular breadcrumbs | Texture quality |
| Binder | Egg wash | Flour mixture | Coating adhesion |
| Seasoning | Garlic salt | Smoked paprika | Flavor enhancement |
| Oil | Extra-virgin olive | Cooking spray | Crispiness factor |
Each selection contributes to the overall success of your preparation. The right combinations create harmony between texture, flavor, and appearance. Your careful choices will be evident in every delicious bite.
Remember that experimentation leads to personal preference discovery. Try different combinations to find your perfect balance. The journey itself becomes part of the enjoyment.
Step-by-Step Preparation Instructions
Transform simple ingredients into a golden delight with these clear steps. You’ll create something special that everyone will enjoy. Follow each phase carefully for the best outcome.

Prepping Your Pickles
Start by draining your chosen items thoroughly. Use paper towels to pat them completely dry. This crucial step prevents coating slippage.
Remove every bit of moisture from each piece. Your effort here ensures the breading sticks perfectly. You’ll achieve that ideal crisp texture.
Creating the Perfect Coating
Set up three separate bowls for your breading station. The first contains flour mixed with your favorite seasonings. The second holds beaten egg for binding.
The third bowl keeps panko crumbs ready for coating. Use the wet hand/dry hand technique to avoid mess. This professional method keeps your fingers clean.
Dip each slice in the flour mixture first. Then move it to the egg wash for complete coverage. Finally, coat it thoroughly in the bread crumbs.
Air Frying to Perfection
Preheat your appliance to 370-400°F before starting. This ensures consistent cooking from the very beginning. Your results will have even color and texture.
Arrange coated pieces in a single layer in the basket. Leave space between them for proper air circulation. Never overcrowd—work in batches if needed.
Cook for 5-14 minutes depending on thickness. Flip halfway through for uniform browning. Watch for that perfect golden color and crisp feel.
“Perfect spacing in the basket is non-negotiable for achieving that restaurant-quality crunch everyone loves.”
| Step | Key Action | Time | Result |
|---|---|---|---|
| Preparation | Thorough drying | 2 minutes | Coating adhesion |
| Breading | Three-bowl method | 5 minutes | Even coverage |
| Cooking | Single layer placement | 5-14 minutes | Perfect crispness |
Monitor your first batch carefully for timing adjustments. Different models may require slight variations. You’ll quickly learn your ideal settings.
These instructions guarantee fantastic results every time. Your dedication to proper technique makes all the difference. Enjoy creating something truly special.
Serving Suggestions and Dipping Sauces
Elevate your snack game with perfect pairings that transform every bite into an experience. The right accompaniments make your creation truly special. You’ll discover how small details create big impressions.
Serve your golden delights immediately after cooking. This preserves that wonderful texture you worked so hard to achieve. Warm items maintain their crisp quality best.
Temperature matters for both your main attraction and accompanying sauces. Room temperature dressings allow flavors to shine through. Chilled options provide refreshing contrast.
The perfect sauce can make or break your flavor experience. Consider these fantastic options for dipping pleasure:
- Classic ranch dressing remains a crowd-pleasing favorite
- Creamy chipotle sauce adds smoky heat complexity
- Vegan ranch accommodates various dietary preferences
- Spicy mayo brings gentle heat with creamy texture
- Honey sriracha offers sweet and spicy harmony
- Remoulade provides tangy Creole-inspired flavors
- Blue cheese delivers bold, distinctive character
Pair different sauces with your base ingredient for flavor harmony. Tangy dressings complement sweeter varieties beautifully. Creamy options balance sharper profiles perfectly.
Presentation transforms simple snacks into impressive offerings. Use small bowls or ramekins for individual dipping portions. Arrange your items on wooden boards or colorful platters.
Garnishes add visual appeal and flavor accents. Fresh dill, parsley, or chives provide color and freshness. Lemon wedges offer bright acidity when squeezed over top.
Beverage pairings enhance the overall experience. Crisp lagers and pale ales cut through richness effectively. Sparkling waters with citrus refresh the palate between bites.
Incorporate these treats into larger menus for gatherings. They make fantastic starters before burgers or sandwiches. Your guests will appreciate the thoughtful preparation.
“The right sauce transforms good snacks into great memories. Don’t underestimate the power of perfect pairings.”
| Sauce Type | Flavor Profile | Best Pairing | Preparation Time |
|---|---|---|---|
| Chipotle Ranch | Smoky, creamy, mild heat | Dill varieties | 5 minutes |
| Honey Sriracha | Sweet, spicy, tangy | Bread and butter style | 3 minutes |
| Remoulade | Tangy, herbaceous, complex | All types | 8 minutes |
| Blue Cheese | Bold, creamy, assertive | Stronger flavored options | 2 minutes |
Remember that simplicity often works best. Sometimes classic ranch dressing satisfies more than complicated creations. Trust your personal preferences above all else.
Your attention to serving details completes the culinary journey. These final touches show care and consideration for your guests. They’ll remember both the taste and the experience.
Variations and Customizations
Personalize your cooking experience with creative twists that suit any dietary need. You can transform the basic formula into something uniquely yours. These adjustments maintain great taste while accommodating preferences.
Explore low-carb options that keep your eating plan on track. Substitute regular flour with almond or coconut varieties. Use finely ground pork rinds instead of traditional breadcrumbs.
This version delivers the same satisfying crunch without carbohydrates. You enjoy all the flavor while staying true to your goals. It’s a smart way to indulge responsibly.
Create egg-free preparations for those with allergies or vegan preferences. Combine flour, cornstarch, water, and hot sauce into a thick batter. This mixture coats your ingredients perfectly without animal products.
Everyone can enjoy these tasty treats regardless of dietary restrictions. You’ll appreciate how simple substitutions open up new possibilities. The results will surprise you with their quality.
Adjust seasonings to match your personal taste preferences. Add cayenne pepper for a spicy kick that wakes up your palate. Experiment with different herb blends for unique flavor profiles.
Some enjoy keeping things simple with just salt and pepper. Others prefer complex seasoning mixtures with multiple spices. Your kitchen becomes a laboratory for delicious discovery.
Try various pickle types to find your favorite combination. Spicy varieties bring heat that contrasts beautifully with cool dipping sauces. Garlic options add aromatic depth to each bite.
Sweet pickles offer a contrasting flavor that many find irresistible. Artisan varieties provide unique tasting experiences worth exploring. You might discover a new favorite combination.
“The beauty of this method lies in its adaptability. You’re not following rules—you’re creating personal preferences that work for your life.”
Gluten-free options work beautifully with the right ingredient swaps. Use certified gluten-free flour and breadcrumb alternatives. These adjustments ensure everyone can enjoy your creations safely.
Different coatings provide exciting texture variations beyond traditional breadcrumbs. Crushed nuts offer rich flavor and satisfying crunch. Parmesan cheese creates a savory crust that browns beautifully.
Remember that thickness affects cooking time and temperature settings. Thicker slices require slightly longer cooking periods. Adjust your timing based on what you’re working with.
Each variation offers a distinct eating experience worth exploring. You’ll develop personal favorites through experimentation. The process itself becomes part of the fun.
| Variation Type | Key Substitutions | Flavor Profile | Best For |
|---|---|---|---|
| Keto-Friendly | Almond flour, pork rinds | Rich, savory, low-carb | Low-carb diets |
| Egg-Free | Flour-cornstarch batter | Light, crisp, vegan | Allergy concerns |
| Spicy Version | Cayenne, chili powder | Bold, heated, intense | Heat lovers |
| Gluten-Free | Certified GF ingredients | Traditional, safe | Celiac needs |
| Gourmet Style | Artisan pickles, herbs | Complex, sophisticated | Special occasions |
Note how different preparations affect final texture and cooking time. Thicker coatings might require slightly lower temperatures. Experience will guide you to perfect results.
Your willingness to experiment leads to delicious discoveries. You might create a signature version that becomes requested at gatherings. The possibilities are limited only by your imagination.
Pro Tips for the Best Results
Elevate your kitchen skills with professional techniques that guarantee perfection. These insider secrets transform good outcomes into extraordinary ones. You’ll achieve consistent quality that impresses everyone.
Drying Techniques
Proper moisture removal makes all the difference in your final texture. Use clean paper towels or kitchen cloths for thorough drying. Press gently but firmly to extract every drop of liquid.
This step ensures your coating mixture adheres perfectly. You prevent the breading from sliding off during the cooking process. The result is even coverage and perfect crispness.
Never rush this crucial preparation phase. Take the extra minute to ensure complete dryness. Your patience will reward you with superior results.
Avoiding Common Mistakes
Overcrowding remains the most frequent error in home kitchens. Always arrange items in a single layer with space between them. This allows hot air to circulate properly.
Preheating your appliance ensures consistent temperature from the start. Never skip this step if you want even browning. Different models may require slight timing adjustments.
Monitor your first batch carefully to learn your ideal settings. Note how thickness affects cooking time in your specific unit. This knowledge helps you achieve perfect results every time.
“The space between items is just as important as the temperature setting. Never compromise on proper arrangement for optimal air flow.”
Storage and Reheating
These treats taste best when served immediately after preparation. If you have leftovers, store them properly to maintain quality. Place cooled items in an airtight container in the refrigerator.
They will keep for up to two days with reasonable texture preservation. For reheating, use your appliance at 350-375°F for 2-3 minutes. A light spray of oil helps restore the original crispness.
Avoid microwave reheating as it creates sogginess. The dry heat method works best for texture recovery. You’ll enjoy nearly fresh quality from your stored batches.
| Challenge | Solution | Result |
|---|---|---|
| Soggy coating | Thorough drying before breading | Perfect adhesion |
| Uneven cooking | Proper spacing in basket | Uniform browning |
| Burnt edges | Lower temperature adjustment | Even coloring |
| Coating falls off | Correct flour-egg-bread process | Secure coverage |
| Soft texture | Adequate preheating | Crisp finish |
These professional methods ensure restaurant-quality outcomes in your home kitchen. You’ll master techniques that separate amateur results from professional ones. Your dedication to proper process makes all the difference.
Remember that each appliance has its unique characteristics. Learn your model’s quirks through careful observation. This knowledge becomes your secret weapon for perfect snacks.
Conclusion: Your New Go-To Appetizer
You’ve just discovered a smarter way to enjoy your favorite snack. This method delivers incredible taste with far less oil than traditional approaches. It’s a game-changer for anyone who loves flavorful food.
Your kitchen skills have leveled up significantly. You can now create restaurant-quality items in minutes. This technique saves both time and effort while delivering amazing results.
This preparation deserves a permanent spot in your recipe collection. It works perfectly for casual snacking or entertaining guests. Everyone will be impressed by your culinary abilities.
Remember how simple substitutions make it versatile for various diets. You’ve mastered techniques that ensure perfect texture every time. Share this discovery with friends who appreciate good food.
Your journey from basic steps to pro tips has been rewarding. Now you can explore other creative recipes with confidence. This is just the beginning of your delicious adventures.