Discover the ultimate way to prepare perfect poultry every single time. This foolproof method delivers consistently flavorful results with minimal effort.
Our approach works wonderfully for various eating plans like keto or Whole30. It’s ideal for busy weeknights when you need dinner fast. Many home cooks love how simple and delicious this technique is.
Using modern kitchen technology means no waiting for oven preheating. You get crispy, satisfying meals with very little oil. Customize with your favorite herbs, spices, or sauces to match any taste.
This guide covers everything from equipment to cooking techniques. You’ll master this versatile protein preparation method in no time!
Key Takeaways
- This method guarantees consistent, delicious results every time
- Perfect for various diets including keto and Whole30
- Ideal for quick weeknight dinners and meal preparation
- No oven preheating required with faster cooking times
- Minimal oil usage creates healthier, crispy outcomes
- Easy to customize with different seasonings and sauces
- Comprehensive guide covers all equipment and techniques
Why You’ll Love This Air Fryer Chicken Breast Recipe
Say goodbye to dry, flavorless poultry with this foolproof technique that guarantees perfection. This approach delivers consistently amazing results that will transform your cooking routine.
You get restaurant-quality meals without the restaurant wait or price tag. The method works beautifully for various dietary needs and preferences.
The Perfect Quick and Healthy Protein
This preparation offers an excellent source of lean protein for your diet. It fits perfectly into healthy eating plans while delivering incredible flavor.
You can enjoy nutritious meals without sacrificing taste or convenience. The cooking process preserves the natural goodness of the ingredients.
Many people following specific diets find this method ideal. It works wonderfully for keto, Whole30, or other wellness-focused approaches.
No Oven Preheating Required
Skip the long wait for your oven to heat up. This technique gets your meal cooking immediately, saving precious minutes.
You’ll appreciate this feature especially on busy weeknights. It also helps keep your kitchen cooler during warm weather months.
The efficiency means less energy consumption too. You get delicious results with minimal environmental impact.
One satisfied home cook shared:
“This changed my weeknight dinner routine completely. I never thought I could get such perfect results so quickly!”
The simplicity makes this approach accessible to everyone. Even beginners can achieve professional-level outcomes with minimal effort.
Customization options let you create endless variations. Pair with your favorite sauces, sides, or seasonings for personalized meals.
| Feature | Benefit | Time Saved |
|---|---|---|
| No brining needed | Natural tenderness preserved | 2-4 hours |
| Instant cooking start | No preheating wait | 15-20 minutes |
| Minimal preparation | Easy cleanup | 10-15 minutes |
| Versatile applications | Multiple meal options | Meal planning time |
The cooking process delivers remarkably moist and flavorful results every time. You’ll enjoy consistently perfect texture without any special techniques.
This method has become a favorite for many home cooks. It offers reliability and delicious outcomes that keep people coming back.
Essential Equipment for Perfect Air Fryer Chicken
Having the right tools makes all the difference in your cooking results. Quality equipment ensures consistent outcomes and simplifies your preparation process.

Choosing the Right Air Fryer Basket
Your appliance’s basket plays a crucial role in achieving even cooking. Proper air circulation prevents uneven results and ensures crispy perfection.
Look for models with spacious designs that prevent overcrowding. The Cosori model offers excellent performance with its well-designed basket system.
Use code AFY15 for 15% off your Cosori purchase. This popular model features smart temperature control and easy cleaning.
Must-Have Kitchen Tools
These essential items will elevate your cooking experience dramatically:
- Meat thermometer: Guarantees perfect doneness and food safety every time
- Kitchen tongs: Prevents burns and keeps your poultry intact during flipping
- Ziplock bags: Makes marinating simple and mess-free
Investing in quality tools pays off with better results and easier prep. These items work together to create flawless meals.
Proper maintenance extends your equipment’s lifespan. Always clean baskets and tools promptly after use.
Good equipment transforms your cooking from good to exceptional. The right tools make this recipe truly shine.
Ingredients for Juicy and Tender Chicken Breast
Gathering the right components is your first step toward culinary success. These carefully selected elements work together to create mouthwatering results every time.
Main Ingredients
Your foundation begins with quality boneless, skinless poultry. Combine this with olive oil and a simple spice blend for incredible flavor.
The oil creates a perfect coating paste that helps seasonings adhere. It also promotes that beautiful golden finish everyone loves.
Essential spices include:
- Kosher salt: Enhances natural flavors without overwhelming
- Paprika: Adds subtle warmth and vibrant color
- Garlic powder: Provides savory depth
- Black pepper: Offers gentle heat
- Oregano: Brings herbal freshness
Measure these accurately using standard teaspoons for consistent outcomes. Proper proportions ensure balanced taste in every bite.
Seasoning Blend Options
Customize your creation with various flavor profiles. Pre-made mixes offer convenience while homemade blends allow creativity.
Popular choices include Italian Seasoning for Mediterranean flair. Cajun Seasoning delivers bold, spicy character that wakes up your palate.
For extra crispiness, try adding brown sugar and cornstarch to your blend. This combination creates that irresistible texture everyone craves.
Consider these adjustments for special diets:
- Low-sodium options: Reduce salt or use salt-free blends
- Keto-friendly: Substitute sugar alternatives
- Allergy considerations: Check blend ingredients carefully
Remember that different salt types vary in intensity. Diamond Kosher Salt requires slightly more volume than table salt.
Experimentation is encouraged! Try your favorite herb combinations to make this dish uniquely yours. The flexible nature of this preparation welcomes personal touches.
One home cook remarked:
“I love how this basic formula adapts to whatever flavors I’m craving. It never gets boring!”
Keep notes on successful combinations for future reference. This helps you recreate favorite versions effortlessly.
Preparation: Getting Your Chicken Ready
Mastering the initial steps ensures your main course turns out perfectly every time. Thoughtful preparation transforms simple ingredients into restaurant-quality meals right in your kitchen.
To Brine or Not to Brine
Brining offers a fantastic way to enhance moisture and flavor in your poultry. This technique involves soaking your meat in a saltwater solution before cooking.
The process works wonders for keeping your dish succulent throughout the cooking process. However, over-brining can lead to excessively salty results that might overwhelm your palate.
For optimal outcomes, limit brining time to one hour maximum. Use a simple ratio of one cup water to one tablespoon kosher salt for best results.
After brining, always rinse and pat your poultry completely dry. This step prevents over-salting and promotes beautiful browning during cooking.
If you’re short on time, consider these excellent alternatives:
- Dry rubs: Create instant flavor with spice blends applied directly
- Quick marinades: Soak for just 30 minutes for noticeable improvement
- Seasoning paste: Combine oil and spices for immediate coating

Creating the Perfect Seasoning Paste
Transform your spices into a flavorful coating that clings perfectly to your poultry. Mix your chosen seasonings with oil in a small bowl to create a thick, spreadable paste.
This method ensures even distribution of flavors across every piece. The oil helps the spices adhere while promoting that golden, crispy exterior everyone loves.
Always pat your meat completely dry before applying any seasoning. Moisture on the surface prevents proper adhesion and can steam rather than brown your dish.
For maximum flavor infusion, marinate your seasoned poultry for at least 30 minutes. Using a ziplock bag makes this process mess-free and incredibly efficient.
One satisfied home cook shared their experience:
“The seasoning paste method revolutionized my weeknight dinners. The flavors penetrate so much better than just sprinkling dry spices!”
Experiment with marinating times from 30 minutes to 24 hours for different intensity levels. Longer marinating allows deeper flavor penetration throughout the meat.
Remember to note your successful combinations for future reference. This helps you recreate favorite versions of this versatile recipe with consistent excellence.
Step-by-Step Cooking Instructions
Follow these simple steps to achieve perfectly cooked results every time. The process is straightforward and delivers consistent outcomes.
Prepping Your Air Fryer
Start by ensuring your appliance is clean and ready for use. Lightly spray the basket with cooking oil to prevent sticking.
Preheating is recommended for optimal results. Set your unit to 370°F and let it warm up for 3-5 minutes.
Arrange your seasoned pieces in a single layer. Avoid overcrowding to ensure proper air circulation.
Cooking Time and Temperature
Cook at 370°F for 10 minutes initially. Then flip each piece and continue for 4-8 additional minutes.
For thinner slices, use 415°F for 10 minutes total. Always check internal temperature rather than relying solely on time.
The target internal temperature is 160°F. Use a reliable meat thermometer for accuracy.
Here’s a quick reference guide based on size:
- Small (5-7 oz.): 14 minutes total
- Medium (8-9 oz.): 16 minutes total
- Large (10+ oz.): 18 minutes total
Always let your cooked pieces rest for 5 minutes before serving. This allows juices to redistribute throughout the meat.
If your poultry needs more time, add 2-3 minute increments. Check temperature after each additional cooking period.
One home cook shared their success:
“Following these timing guidelines transformed my results. I finally get perfect doneness every single time!”
Different appliance models may require slight adjustments. Lower-wattage units might need extra cooking time.
Remember that thickness affects cooking more than weight. Adjust times accordingly for uniform pieces.
Mastering the Flip: When and How to Turn Your Chicken
Proper flipping technique transforms your cooking results dramatically. This simple action ensures perfect browning and even doneness throughout your meal.
Understanding when and how to turn your pieces makes all the difference. You’ll achieve professional results with minimal effort.

Why Flipping Matters
Turning your pieces promotes uniform cooking on both sides. It prevents one side from becoming overcooked while the other remains underdone.
The top heating element in your appliance requires this action for balanced crisping. Without turning, the top might brown too quickly while the bottom stays pale.
This technique ensures that heat distributes evenly across all surfaces. You get consistent texture and appearance throughout your dish.
One home cook shared their experience:
“Learning the proper flip changed everything! My meals now have that perfect golden color on both sides.”
The Perfect Flip Technique
Use kitchen tongs with silicone tips for the best results. Gently turn each piece halfway through the cooking time.
Avoid piercing the meat to retain all those delicious juices. Slide your tongs underneath and flip in one smooth motion.
Time your flip when the first side reaches a golden brown color. This usually occurs around the 8-10 minute mark for most recipes.
Follow these essential tips for flawless flipping:
- Choose the right tools: Silicone-tipped tongs protect your basket and prevent damage
- Check progress: Peek through the viewing window before opening your appliance
- Work quickly: Minimize heat loss by completing your flips within 30 seconds
- Space properly: Ensure pieces aren’t touching for easy individual turning
Forgetting to flip isn’t catastrophic, but results won’t be as uniform. The bottom might be slightly less crispy than the top portion.
Different thicknesses might require adjusted flipping times. Thicker cuts benefit from turning at the 10-minute mark.
| Thickness | First Side Time | Second Side Time | Total Time |
|---|---|---|---|
| Thin (1/2 inch) | 6 minutes | 4 minutes | 10 minutes |
| Medium (3/4 inch) | 8 minutes | 6 minutes | 14 minutes |
| Thick (1 inch) | 10 minutes | 8 minutes | 18 minutes |
This simple technique significantly improves your final dish’s texture. You’ll notice better moisture retention and more appealing appearance.
Practice makes perfect with this essential cooking skill. Soon it will become second nature in your kitchen routine.
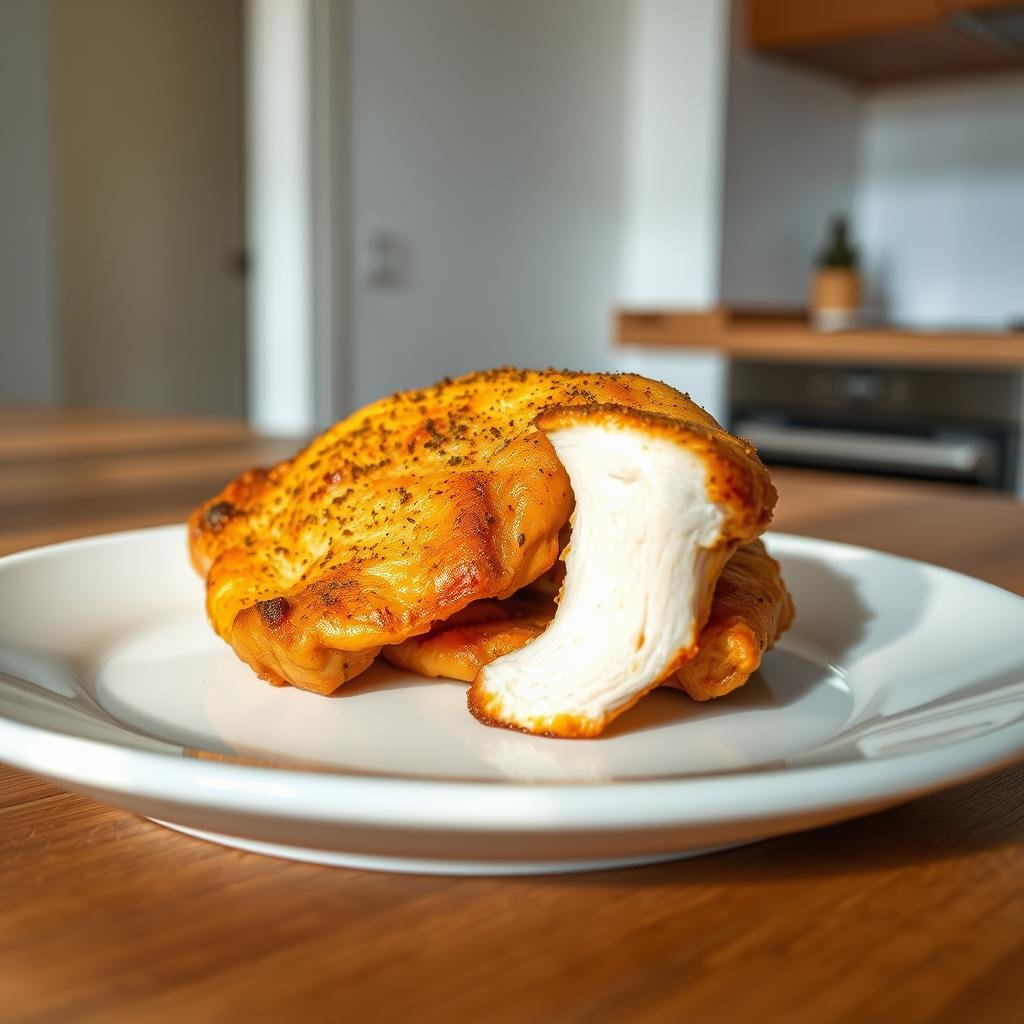
Checking Doneness: Internal Temperature Guide
Getting your poultry perfectly cooked requires knowing exactly when it’s ready. This guide shows you the most reliable methods to ensure safety and quality every time.
Using a Meat Thermometer
A digital thermometer is your best friend in the kitchen. It provides precise readings that take the guesswork out of cooking.
Insert the probe into the thickest part of your meat. Avoid touching any bones for an accurate measurement.
The target temperature is 165°F for safety. Remove your poultry at 160°F since residual heat will continue cooking it.
This tool prevents both undercooking and overcooking. You get safe, moist results consistently.
One home cook shared:
“My thermometer changed everything! I never serve dry or undercooked meals anymore.”
Invest in a quality instant-read model. It works for all types of meat and cooking methods.
Visual Doneness Indicators
Sometimes you might not have a thermometer available. Visual cues can help though they’re less reliable.
Check that the juices run clear when pierced. There should be no pink color remaining in the thickest area.
Cutting into the meat to check is an option. Remember that this releases valuable juices and affects moisture.
Resting time is crucial for final doneness. The temperature will rise about 5 degrees during this period.
For best results, always use a thermometer. Visual methods should only be temporary solutions.
The Secret to Juicy Chicken: Resting Time
That final step after cooking makes all the difference between good and great results. This simple technique transforms your meal from merely cooked to perfectly prepared.
Why Resting is Non-Negotiable
Resting allows the natural juices to redistribute evenly throughout your poultry. When heat is applied, those precious fluids move toward the center.
If you slice immediately, those juices escape onto your cutting board. The result is drier, less flavorful meat that disappoints.
The muscle fibers also relax during this period. They reabsorb moisture that would otherwise be lost.
One satisfied cook noted:
“I used to skip resting because I was impatient. Now I understand those five minutes create magical results!”
How to Properly Rest Your Chicken
Transfer your cooked pieces to a clean plate or cutting board. Tent loosely with aluminum foil to retain warmth.
Let it sit undisturbed for exactly five minutes. This brief period works wonders for texture and moisture.
For larger batches, keep everything warm in a slightly heated oven. Set the temperature to 170°F if needed.
Always make this your final step before serving. The improvement in quality is immediately noticeable.
This practice applies to all meat preparation methods. Your roasted, grilled, or air fried dishes will benefit equally.
Those few minutes don’t add significant time to your process. They dramatically enhance your final results.
Delicious Variations and Flavor Twists
Transform your basic preparation into exciting culinary adventures with simple adjustments. The beauty of this method lies in its incredible adaptability to different tastes and preferences.
Seasoning Blend Alternatives
Experiment with different flavor profiles to keep your meals exciting. Italian seasoning brings Mediterranean herbs that pair beautifully with olive oil.
Cajun seasoning delivers bold, spicy character that wakes up your palate. For tangy options, try marinating in Italian dressing before cooking.
Global flavors open up endless possibilities. Gochujang sauce adds Korean-inspired sweetness and heat. Peruvian green sauce offers bright, herbaceous notes.
One creative cook shared their experience:
“Switching up seasonings makes this feel like a completely new recipe each time. My family never gets bored!”
Adding Vegetables to the Basket
Create complete meals by incorporating vegetables directly into your cooking process. Add them halfway through to prevent overcooking.
Season vegetables separately with oil and complementary spices. This ensures everything cooks perfectly and tastes amazing.
Popular vegetable options include:
- Zucchini: Slices cook quickly and absorb flavors well
- Brussels sprouts: Become crispy and caramelized
- Broccoli: Develops delicious roasted edges
- Red peppers: Add sweetness and vibrant color
- Asparagus: Cooks fast and pairs beautifully
This one-appliance approach saves time and cleanup. You get balanced meals with minimal effort.
| Vegetable | Preparation | Cooking Time | Seasoning Pairing |
|---|---|---|---|
| Zucchini | ½-inch slices | 8-10 minutes | Italian herbs |
| Brussels sprouts | Halved | 12-15 minutes | Garlic powder |
| Broccoli | Florets | 10-12 minutes | Lemon pepper |
| Red peppers | 1-inch strips | 8-10 minutes | Smoked paprika |
| Asparagus | Trimmed | 6-8 minutes | Sea salt |
The versatility of this cooking method accommodates countless variations. Adjust flavors based on your dietary needs and personal preferences.
Remember that different vegetables require varied cooking times. Always check doneness before serving.
This approach transforms simple meals into exciting culinary experiences. You’ll love discovering new flavor combinations.
Serving Suggestions and Meal Ideas
Transform your perfectly cooked poultry into complete, memorable meals with these inspired pairing ideas. The right accompaniments elevate your main dish from simple to spectacular.
Balance flavors and textures to create harmonious plates. Consider cooking methods, seasoning profiles, and visual appeal when planning.
Perfect Side Dishes
Choose sides that complement without overwhelming your main protein. Creamy Instant Pot Risotto adds luxurious texture that pairs beautifully.
Elegant Sous Vide Asparagus brings sophisticated simplicity to your table. For quick options, try air fryer broccoli or Brussels sprouts.
Green rice offers a Latin-inspired twist that’s both flavorful and colorful. These sides work well for various dietary preferences.
One creative home cook shared:
“The right side dish transforms my weeknight meal into something special. These combinations make dinner feel like a restaurant experience!”
Consider these excellent pairings:
- Instant Pot Risotto: Creamy texture balances the crispy exterior
- Sous Vide Asparagus: Elegant presentation with perfect tenderness
- Air fryer broccoli: Simple preparation with roasted flavor
- Brussels sprouts: Crispy, caramelized contrast to juicy meat
- Green rice: Vibrant Latin-inspired accompaniment
Sauce Pairings That Elevate Your Chicken
Sauces add moisture, flavor, and visual appeal to your dishes. Rich mushroom sauce brings earthy depth that complements the seasoning.
Tangy white BBQ sauce offers a unique Southern twist. Spicy gochujang dipping sauce introduces Korean-inspired heat.
Peruvian creamy green sauce provides bright, herbaceous notes. Lemon butter sauce adds classic simplicity with citrus freshness.
Serve sauces on the side for customizable meals. This allows everyone to enjoy their preferred flavor intensity.
For meal preparation, store sauces separately. This maintains freshness and prevents sogginess when reheating.
Experiment with these sauce options:
- Mushroom sauce: Earthy richness perfect for comfort meals
- White BBQ sauce: Tangy alternative to traditional barbecue
- Gochujang sauce: Spicy Korean-inspired option
- Peruvian green sauce: Bright, herbaceous complement
- Lemon butter sauce: Classic simplicity with citrus notes
Create themed meals by pairing sides and sauces cohesively. Italian-inspired nights might feature risotto with herb butter sauce.
Asian fusion meals could include gochujang sauce with quick-pickled vegetables. Latin nights pair beautifully with green rice and creamy sauces.
For healthy options, serve over fresh greens with light vinaigrette. Indulgent meals might feature creamy pasta sides with rich sauces.
Get creative with presentations for family enjoyment. Slice your protein over salads for complete meals in one bowl.
Serve with dipping sauces for interactive, fun dining experiences. Children especially enjoy customizing their own plates.
Remember that your main dish should remain the star. Choose complements that enhance rather than compete with your perfectly cooked poultry.
Storage and Reheating Instructions
Keep your delicious meals tasting fresh with these simple storage solutions. Proper techniques maintain quality and safety for later enjoyment.
You worked hard to create that perfect dish. Now learn how to preserve its wonderful texture and flavor.
Proper Refrigeration Techniques
Cool your cooked poultry completely before storing. This prevents condensation that could make it soggy.
Use airtight containers to lock in moisture. They also prevent odor transfer in your refrigerator.
Label containers with preparation dates for easy tracking. Consume within three days for best quality.
For meal preparation, portion into individual servings. This makes grab-and-go lunches incredibly convenient.
Best Reheating Methods
Restore that just-cooked freshness with careful reheating. The stovetop method works beautifully for moist results.
Add a splash of water or broth to your skillet. Cover and heat gently until warmed through.
Your appliance can also refresh leftovers quickly. Use lower temperatures to avoid overcooking.
Always check that internal temperature reaches 165°F. This ensures food safety during reheating.
One satisfied cook shared:
“These reheating tips saved my leftovers! My meals taste almost as good as fresh from the cooker.”
For frozen items, thaw overnight in your refrigerator. Never thaw at room temperature for safety reasons.
Get creative with repurposing your cooked protein. Add to salads, soups, or sandwiches for quick new meals.
Freeze portions in labeled freezer bags for longer storage. They keep well for up to three months.
Wrap tightly in plastic wrap before freezing. This prevents freezer burn and maintains quality.
Conclusion: Your New Go-To Chicken Recipe
This foolproof method delivers consistently perfect results with minimal effort. You get moist, flavorful protein every time without complicated techniques.
The approach works beautifully for various eating plans and busy schedules. Customize with your favorite herbs and spices for endless variety.
Remember to use your meat thermometer and allow proper resting time. Share your creations using #platingsandpairings to join our cooking community.
Make this recipe your kitchen staple for reliable, delicious meals. Explore more easy cooking ideas to expand your culinary skills!