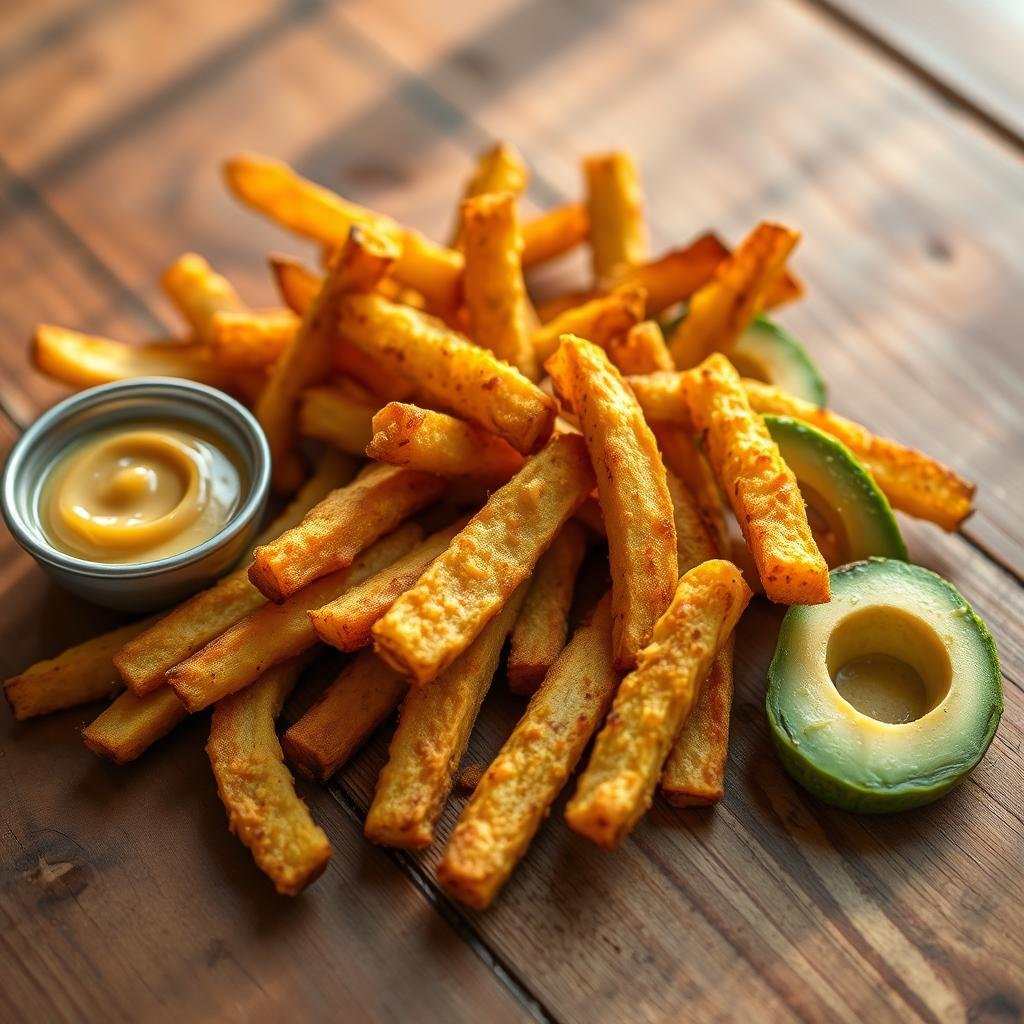
Are you looking for a delicious snack that satisfies your cravings without the guilt? Imagine biting into something with a perfect golden crust and a rich, buttery center. This recipe transforms simple ingredients into an extraordinary treat.
Your kitchen appliance creates magic with little oil. It delivers that satisfying crunch we all love. You get fantastic results in just minutes, not hours.
This method cuts down on fat while keeping all the flavor. You’ll enjoy a snack packed with fiber and essential vitamins. It’s a smart choice for health-conscious food lovers.
Even without special equipment, we’ve got you covered. Our guide includes alternative methods so everyone can enjoy this dish. Get ready to impress your family with your culinary skills!
Key Takeaways
- Create a healthier version of fried foods using modern kitchen technology
- Achieve perfect texture with minimal oil in less time than traditional methods
- Select ripe but firm fruits for the best results in this preparation
- Enjoy a snack rich in nutrients like fiber and essential vitamins
- Adapt the recipe for conventional ovens if you don’t have specialized equipment
- Perfect for entertaining or as a satisfying weeknight treat
- This post may contain affiliate links that support our content at no extra cost to you
Why You’ll Love These Air Fryer Avocado Fries
Discover a snack that transforms ordinary moments into extraordinary experiences. These golden delights offer more than just great taste—they deliver a complete sensory adventure.
The Perfect Texture Combination
Experience that magical contrast between textures. The outside turns beautifully golden with a satisfying crunch.
Inside, you’ll find a luxuriously smooth center that melts in your mouth. This combination creates an unforgettable eating experience.
Healthier Than Traditional Fries
Your favorite snack just got smarter. This method uses hot air circulation instead of oil immersion.
You get up to 80% less fat compared to deep-fried versions. The main ingredient provides healthy monounsaturated fats and essential nutrients.
These fries offer more fiber and vitamins than potato versions. They support heart health while keeping you satisfied longer.
Quick and Easy Preparation
Busy schedules demand efficient solutions. This recipe requires just 10 minutes of preparation time.
The cooking process takes about 10 minutes in your countertop appliance. You need minimal ingredients for fantastic results.
Even beginners achieve restaurant-quality outcomes. It’s perfect for snacks, appetizers, or as a side dish.
Essential Ingredients for Perfect Avocado Fries
Great meals begin with quality components. Your success with this recipe depends on selecting the right elements. Each ingredient plays a specific role in creating that ideal texture and flavor.

Choosing the Right Avocados
Select Hass avocados that feel ripe but firm. They should yield slightly to gentle pressure without feeling mushy. This ensures they maintain their shape during the cooking process.
Proper selection prevents your fries from turning soggy. You want that perfect balance between creamy interior and sturdy structure.
Breading Station Components
You’ll need three essential components for coating. Start with all-purpose flour or a gluten-free alternative. This creates the base layer that helps everything stick.
The second container holds your binding agent. Use beaten eggs or aquafaba for a vegan version. This moist layer allows the final coating to adhere properly.
Your third component is panko breadcrumbs. These Japanese-style crumbs create an exceptionally light and crunchy texture. They absorb less oil than regular breadcrumbs during cooking.
“The right breading makes all the difference between good and extraordinary results.”
Spice Blend Options
Customize your flavor profile with these suggestions:
- Chili powder and paprika for a subtle heat
- Garlic powder and onion powder for savory depth
- Salt and black pepper for basic seasoning
- Optional cumin or parsley for additional complexity
For a cheesy variation, add grated Parmesan to your panko mixture. This creates a richer flavor and enhances browning.
Measure your spices before starting. Having everything prepared saves time and makes the process smoother.
Your spice blend should total about one tablespoon per cup of breadcrumbs. Adjust according to your taste preferences.
How to Prepare Your Avocados Like a Pro
Mastering preparation techniques transforms ordinary ingredients into culinary masterpieces. Your success with this dish begins long before the cooking process starts. Proper handling ensures beautiful presentation and perfect texture.
Selecting Ripe But Firm Avocados
Choose Hass varieties with dark green to black skin. They should yield slightly to gentle pressure without feeling mushy. Avoid any with soft spots or obvious bruising.
Perfect ripeness means they maintain their shape during preparation. This balance creates that ideal creamy interior with structural integrity. Your selection directly impacts the final quality.
Proper Slicing Technique
Use a sharp knife to slice each fruit in half lengthwise. Twist gently to separate the halves around the pit. Carefully remove the pit with your knife or a spoon.
Place each half flat-side down on your cutting board. Cut into 3-4 uniform wedges depending on size. Consistent sizing ensures even cooking throughout your batch.
Peeling Without Damaging
Gently slide your thumb between the skin and flesh. Ease the peel away in one smooth motion. This technique preserves the delicate structure perfectly.
Alternatively, slice into wedges first while still in the skin. Use a spoon or your fingers to pop each piece out cleanly. Both methods protect the shape for optimal results.
| Preparation Step | Key Technique | Time Required | Pro Tip |
|---|---|---|---|
| Selecting | Gentle pressure test | 1 minute | Choose darker skin with slight give |
| Slicing | Lengthwise cut and twist | 2 minutes | Use sharp knife for clean cuts |
| Peeling | Thumb separation method | 2 minutes | Work from wider end to narrow tip |
| Wedging | Uniform sizing | 1 minute | 3-4 pieces per half depending on size |
These preparation methods set the foundation for exceptional results. You’ll create pieces that hold their shape through the entire recipe. Proper technique makes the difference between good and extraordinary outcomes.
Setting Up Your Breading Station
Organization transforms cooking from chaotic to controlled. Your preparation area becomes the foundation for perfect results. A well-designed workspace ensures efficiency and consistency throughout the process.

The Three-Bowl Method
This classic technique creates an assembly line for coating. You’ll need three shallow containers arranged in sequence. This system prevents cross-contamination and maintains order.
Place your bowls left to right for right-handed users. Reverse the order if you’re left-handed. This setup saves time and reduces mess during preparation.
Dry Ingredients Preparation
Start with one cup of all-purpose flour in your first bowl. Add spices like garlic powder and paprika. Use about one teaspoon of each seasoning.
Whisk everything together until fully combined. This ensures even flavor distribution on every piece. Your dry mixture should look uniform in color and texture.
Wet Ingredients Preparation
Crack one large egg into your second bowl. Add a splash of water and beat until frothy. This creates the perfect binding agent for your coating.
For vegan options, use aquafaba instead. This chickpea liquid works equally well. Both options provide excellent adhesion for the final layer.
Your third bowl holds panko breadcrumbs. These Japanese-style crumbs create exceptional texture. Add grated Parmesan if desired for extra flavor.
“Proper organization turns breading from messy chore to satisfying process.”
This station setup takes just five minutes to assemble. You’ll coat your avocado slices with precision and speed. The result is consistently perfect coverage every time.
Mastering the Breading Technique
Perfecting your coating method makes all the difference between good and great results. This crucial step transforms simple ingredients into something truly special. You’ll create a golden exterior that stays put through the entire cooking process.
Step-by-Step Coating Process
Begin with your prepared avocado slices. Dredge each piece in seasoned flour. Tap gently to remove any excess.
Next, dip the floured slice into your egg mixture. Let any extra liquid drip off. This creates the perfect adhesive layer.
Finally, press the piece into panko breadcrumbs. Coat all sides thoroughly. Gentle pressure helps everything stick properly.
Wet Hand/Dry Hand Method
Keep one hand for wet ingredients only. Use this hand for dipping in the egg mixture. Your other hand handles dry components.
This technique prevents messy, clumpy fingers. You maintain a clean and efficient workspace. The method saves time and reduces frustration.
Ensuring Even Coverage
Press breadcrumbs firmly onto each slice. Check for any bare spots. Fill gaps with additional crumbs if needed.
If crumbs refuse to stick, try a light oil spray. This trick improves adhesion significantly. You’ll achieve uniform coverage every time.
| Coating Step | Key Action | Pro Tip | Time per Slice |
|---|---|---|---|
| Flour Dredge | Light coating, tap off excess | Use wide, shallow bowl for easy access | 5 seconds |
| Egg Dip | Complete immersion, drain excess | Hold above bowl for 2 seconds | 3 seconds |
| Panko Press | Firm, even pressure on all sides | Use dry hand to sprinkle crumbs if needed | 7 seconds |
| Final Check | Inspect for uncovered areas | Rotate slice to view all angles | 2 seconds |
Place finished pieces on a clean plate. Keep them in a single layer. This prevents sticking before they hit the heat.
Your perfect breading guarantees fantastic texture. The exterior becomes wonderfully crunchy. Inside remains luxuriously smooth.
Air Fryer Avocado Fries (Crispy & Creamy) – Cooking Instructions
The moment of truth has arrived – it’s time to transform your prepared ingredients into golden perfection. Your countertop appliance works its magic with precision heat and air circulation. You’ll achieve restaurant-quality results right in your own kitchen.

Preheating Your Air Fryer
Always start with a properly heated unit. Set your temperature to 390°F for most models. Some units may require 400°F for optimal performance.
Allow three to five minutes for complete warming. This ensures immediate crisping when you add your prepared pieces. Proper preheating guarantees even cooking from the very start.
Proper Basket Arrangement
Lightly mist your cooking surface with avocado or vegetable oil spray. This prevents sticking and promotes beautiful browning. Your coating will develop that perfect golden color.
Arrange your breaded pieces in a single layer with space between them. Avoid overcrowding at all costs. Proper spacing allows hot air to circulate freely around each piece.
This technique ensures all sides become equally crisp and golden. You’ll achieve consistent results throughout your entire batch.
Temperature and Timing
Maintain 390°F throughout the cooking process. Set your timer for seven to ten minutes total. The exact time depends on your specific model and slice thickness.
Flip your pieces halfway through the cooking time. This simple step ensures both sides develop perfect color and texture. Use tongs for gentle turning to preserve the coating.
Watch carefully during the final minutes. Your finished product should show golden brown breading with warm, tender interiors. Remove them when they reach your desired crispness level.
“Perfect temperature control transforms simple ingredients into extraordinary treats with minimal effort.”
Follow these guidelines for foolproof results every time. Your kitchen appliance delivers amazing texture with health-conscious preparation. Enjoy your creation immediately for the best eating experience.
Oven-Baked Alternative Method
Your conventional oven can produce equally impressive results with slight adjustments. This approach maintains the delicious qualities while using equipment you already own. The method requires minimal changes to achieve that satisfying texture.
Preheating and Setup
Begin by heating your oven to 425°F. This temperature creates the ideal environment for proper browning. The hot setting mimics rapid crisping action found in specialized appliances.
Allow sufficient time for complete warming. Most units need about ten minutes to reach optimal temperature. Proper preheating ensures immediate cooking when you add your prepared pieces.
Baking Sheet Preparation
Select a standard baking sheet for your preparation. Lightly grease the surface or place a cooling rack on top. This technique allows air circulation underneath your items.
The rack method promotes all-around crispiness. It prevents steaming and ensures even browning throughout. Both approaches work well for this particular recipe.
Oven Temperature and Time
Arrange your breaded slices in a single layer on the prepared surface. Ensure they don’t touch to prevent steaming. Proper spacing promotes even browning across all pieces.
Bake for 15-20 minutes total cooking time. Flip your items halfway through the process. This ensures both sides develop perfect color and texture.
Convection oven settings may reduce required minutes slightly. They achieve even crispier results similar to specialized appliances. Monitor closely during the final moments.
“The oven method delivers satisfying texture that makes the extra time completely worthwhile.”
| Method | Temperature | Time | Key Advantage |
|---|---|---|---|
| Conventional Oven | 425°F | 15-20 minutes | No special equipment needed |
| Convection Oven | 425°F | 12-18 minutes | Enhanced air circulation |
| With Cooling Rack | 425°F | 15-20 minutes | All-around crispiness |
| Direct on Sheet | 425°F | 15-20 minutes | Simplest preparation |
This alternative approach maintains the nutritional benefits. You still get reduced fat content and excellent fiber. The final product remains a smart choice for health-conscious eating.
Though requiring more time than specialized methods, the results justify the wait. Your finished items will feature that perfect contrast between textures. The exterior becomes wonderfully golden while the interior stays luxuriously smooth.
Delicious Dipping Sauce Options
Transform your golden delights with incredible flavor companions. The right dipping sauce elevates your snack to new heights. These combinations create memorable taste experiences.
Your sauce selection adds personality to each bite. You can prepare these in just a few minutes. Most require simple ingredients from your pantry.
Creamy Ranch Variations
Classic buttermilk ranch offers timeless appeal. This versatile dipping option complements many flavors beautifully.
Enhance your basic ranch with fresh herbs. Try dill or chives for a garden-fresh twist. Each addition creates a unique personality.
Combine half a cup of mayonnaise with buttermilk. Add garlic powder and dried parsley. Whisk until smooth and creamy.
Spicy Mayo Combinations
Create exciting heat with simple mixtures. Blend mayonnaise with your favorite hot sauce. Sriracha works particularly well.
Add a squeeze of lime juice for brightness. This cuts through the richness perfectly. Adjust heat levels to your preference.
Start with one teaspoon of hot sauce per quarter cup. Taste and adjust as needed. Remember, you can always add more heat.
Other Flavor Pairings
Explore global influences with these suggestions. Chipotle aioli brings smoky depth to your snack. Buffalo ranch offers tangy heat.
Honey sriracha balances sweet and spicy notes. Tahini dressing provides nutty complexity. Each option creates a different experience.
Vegan alternatives work equally well. Cashew ranch delivers creaminess without dairy. These options accommodate various dietary needs.
“The perfect sauce transforms good food into great memories with every dip.”
| Sauce Type | Key Ingredients | Preparation Time | Flavor Profile |
|---|---|---|---|
| Classic Ranch | Buttermilk, mayo, herbs | 5 minutes | Creamy, herbal |
| Spicy Mayo | Mayonnaise, hot sauce, lime | 3 minutes | Tangy, spicy |
| Chipotle Aioli | Mayo, chipotle, garlic | 5 minutes | Smoky, garlicky |
| Buffalo Ranch | Ranch, hot sauce | 2 minutes | Tangy, creamy |
| Tahini Dressing | Tahini, lemon, garlic | 4 minutes | Nutty, bright |
Prepare your sauce ahead of time for best results. Flavors meld and develop in the refrigerator. Store in an airtight container until serving.
Even simple options like ketchup work well. Don’t hesitate to experiment with favorites. Your perfect dipping companion awaits discovery.
These sauces add minimal fat while maximizing flavor. They complement the natural fiber and vitamin content. Your snack becomes a complete taste experience.
Serving Suggestions and Meal Ideas
Your golden creations deserve perfect presentation for maximum enjoyment. These versatile pieces adapt beautifully to various dining scenarios. They transform ordinary meals into extraordinary experiences.
Game Day Appetizer
Impress your guests with an irresistible finger food spread. Serve these alongside other popular snacks like portobello pieces or cheeseburger rolls.
Your preparation time remains minimal even for large gatherings. The recipe scales easily to feed hungry crowds.
Weeknight Side Dish
Pair your creation with main courses for balanced nutrition. They complement creamy pesto pasta or crispy chicken burgers perfectly.
This side adds valuable fiber and essential vitamin content to your meal. You get satisfying texture with reduced fat content.
Incorporating into Main Dishes
Add these to vegetarian tacos or burritos for extra dimension. Their texture contrasts wonderfully with other ingredients.
They work excellently as salad toppings or bowl additions. The crunchy element elevates greens and grains beautifully.
Offer multiple dipping sauces for interactive enjoyment. Your container of sauces caters to various taste preferences.
These adapt to casual family dinners or festive gatherings. Their rich flavor profile pleases diverse crowds effortlessly.
“Versatile serving options transform good food into great dining experiences that guests remember.”
| Meal Occasion | Pairing Suggestions | Preparation Time |
|---|---|---|
| Game Day | Portobello pieces, cheeseburger rolls | 15 minutes |
| Weeknight Dinner | Pesto pasta, chicken burgers, gochujang noodles | 10 minutes |
| Main Dish Incorporation | Tacos, burritos, wraps, salads | 5 minutes |
Your cooking efforts yield remarkably flexible results. The same recipe serves multiple purposes beautifully.
Whether baking or frying, your slices maintain their excellent qualities. They deliver consistent satisfaction across all applications.
Storage and Reheating Tips
Keep your delicious snacks tasting fresh with these smart storage solutions. Proper techniques preserve that wonderful texture you worked so hard to achieve. You’ll enjoy your creation days after initial preparation.
Follow these guidelines to maintain quality and flavor. Your efforts deserve protection against spoilage and texture loss.
Proper Refrigeration Methods
Cool your snacks completely before storing. This prevents condensation inside your container.
Place them in a single layer whenever possible. Use parchment paper between layers if needed.
Seal them in an airtight container immediately. This maintains freshness for two to three days.
Your refrigerator becomes the perfect preservation tool. Proper storage prevents odor absorption.
Freezing Instructions
Freezing extends enjoyment for months rather than days. Use this method for longer-term storage.
Arrange pieces in a single layer on a baking sheet. Freeze until completely solid before transferring.
Place frozen items in an airtight container or freezer bag. They remain perfect for up to three months.
This technique prevents sticking and maintains individual integrity. Your future self will thank you.
Best Reheating Practices
Revive your snacks to near-original perfection. The right approach restores texture beautifully.
Use your countertop appliance at 350°F for three to four minutes. Conventional ovens work at 350°F for five to eight minutes.
Always reheat in a single layer for even results. This mimics the initial cooking process perfectly.
Avoid microwave reheating at all costs. It creates undesirable sogginess every time.
“Proper storage and reheating transform leftovers into fresh-tasting delights that satisfy just like the first time.”
| Storage Method | Duration | Key Consideration |
|---|---|---|
| Refrigeration | 2-3 days | Use airtight container |
| Freezing | 3 months | Freeze individually first |
| Room Temperature | 2 hours | Not recommended |
Thaw frozen items overnight in your refrigerator for best results. You can reheat directly from frozen with slightly longer timing.
These methods preserve the nutritional benefits of your recipe. You maintain reduced fat content while keeping valuable fiber and vitamins.
Your ingredients deserve proper care from preparation to enjoyment. Smart storage makes this recipe practical for meal preparation.
Enjoy your creation days after initial cooking with confidence. Proper techniques ensure quality never suffers.
Conclusion
You’ve just unlocked the secrets to creating restaurant-quality snacks right in your kitchen. This comprehensive guide gives you everything needed for perfect results every time.
Your new recipe offers a healthier alternative to traditional methods. It significantly reduces fat content while delivering excellent texture in minimal minutes.
Remember to select ripe but firm produce and maintain proper spacing during cooking. Your efficient preparation station ensures consistent coating and ideal crispness.
Experiment with different seasonings and dipping companions to personalize your creation. Enjoy these versatile pieces as snacks, appetizers, or side dishes.
Share your successful results on social media and tag us! We love seeing your creative variations on this fantastic dish.
Explore our other content for more delicious ideas and cooking techniques. Consider joining our newsletter for regular updates and inspiration.
Thank you for reading – your delicious homemade treats await! This post may contain affiliate links that support our content at no extra cost to you.