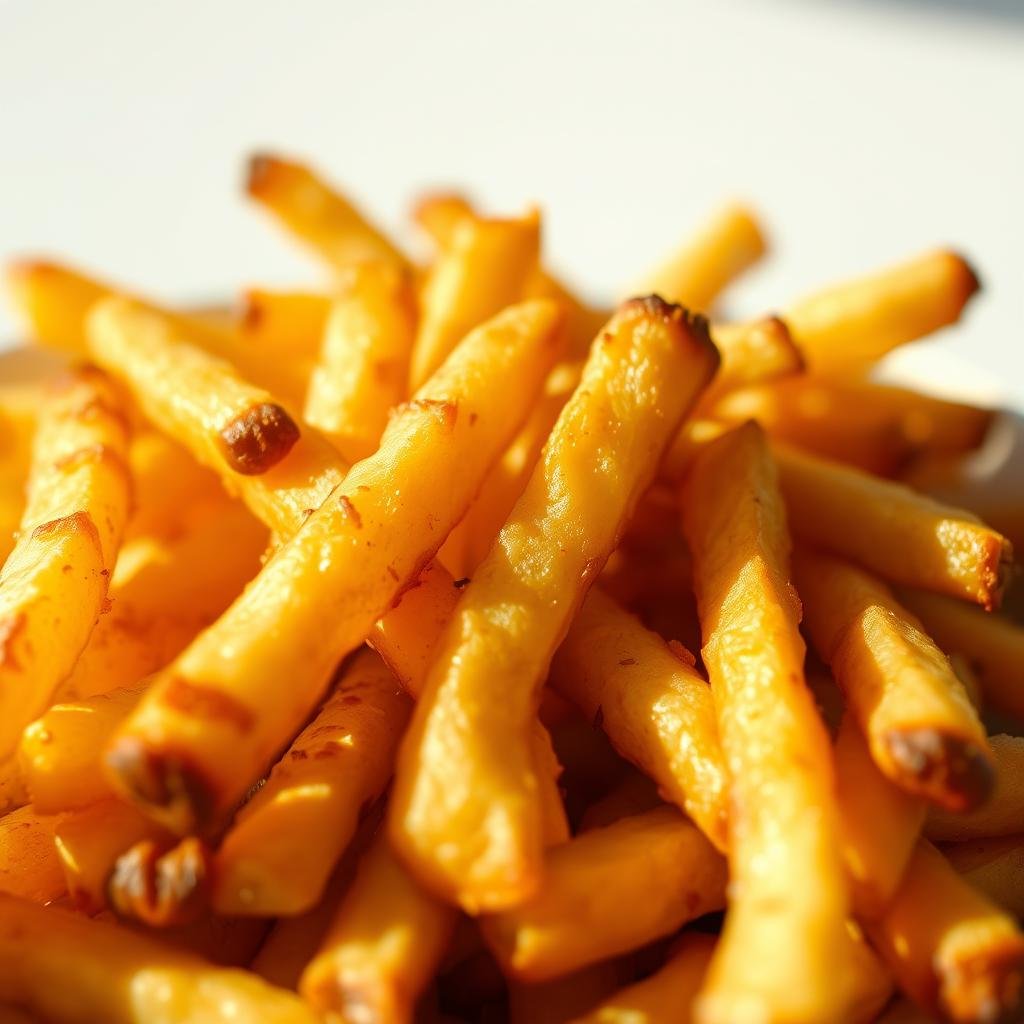
Welcome to your ultimate guide for creating perfectly crispy and golden snacks right at home. This method transforms ordinary potatoes into something extraordinary with minimal effort and maximum flavor.
Discover how this cooking technique delivers that irresistible crunch while using significantly less oil than traditional methods. You get all the satisfaction of your favorite snack with a healthier approach that doesn’t compromise on taste.
Our step-by-step journey will take you from selecting the right potatoes to mastering the cutting and cooking process. Whether you’re new to this appliance or looking to upgrade your technique, we eliminate all guesswork.
In just about 35 minutes total time, you can achieve restaurant-quality results that will become a staple in your snack repertoire. Get ready to satisfy those cravings with a method that saves time and reduces kitchen mess.
Key Takeaways
- Air frying creates crispy results with up to 80% less oil than deep frying
- Proper potato selection and cutting technique are crucial for perfect texture
- The entire process from prep to plate takes approximately 35 minutes
- Seasoning and proper spacing in the basket ensure even cooking
- This method delivers restaurant-quality fries with healthier ingredients
- Easy cleanup makes this recipe ideal for busy weeknights
- Customizable seasonings let you create your perfect flavor profile
Why Air Fryer French Fries Will Change Your Snack Game Forever
Imagine biting into golden-brown potato sticks with that satisfying crunch you love. Now picture achieving this with minimal oil and maximum health benefits. This cooking method transforms your snack routine completely.

You get restaurant-quality texture without deep frying’s drawbacks. The secret lies in rapid hot air circulation that cooks food evenly. Your results will amaze you every time.
The Healthier Alternative to Deep Frying You’ve Been Waiting For
Traditional deep-fried options pack unnecessary fat and calories. This innovative approach uses just 1-2 tablespoons of oil per batch. You save hundreds of calories while enjoying your favorite snacks.
Compare these nutritional differences:
| Preparation Method | Calories (4oz serving) | Fat Content | Prep Time |
|---|---|---|---|
| Deep Fried | 320 | 17g | 20 minutes |
| Oven Baked | 220 | 9g | 45 minutes |
| Air Fried | 135 | 4g | 35 minutes |
You eliminate preservatives found in frozen store-bought varieties. Homemade means controlling exactly what goes into your body. This matters for long-term wellness goals.
How Air Frying Creates That Perfect Crispy Texture
The technology behind this appliance is surprisingly simple. A powerful heating element and fan work together. They blow superheated air around your food at high speed.
This process creates the Maillard reaction – the same chemical process that gives deep-fried food its characteristic crust and flavor. You achieve that desirable golden color without oil immersion. The results speak for themselves.
One enthusiast perfectly captured the experience:
“These tasted just like my favorite restaurant’s version but felt lighter and cleaner. The texture was perfect – crispy outside, fluffy inside.”
Your machine preheats in just 2-3 minutes. It cooks faster than conventional ovens. This means satisfying cravings quickly on busy nights.
You’ll appreciate the reduced cleanup too. No more dealing with gallons of used oil. Just a simple basket wipe-down completes your cooking session.
This versatile appliance handles much more than potato sticks. You can prepare chicken wings, bacon, and even desserts. It becomes your go-to kitchen companion for healthier cooking.
Choose oils with high smoke points like avocado oil (500°F) for best results. They withstand the high temperatures without breaking down. This ensures optimal flavor and safety.
You’re not just making snacks – you’re creating healthier versions of beloved classics. This method aligns perfectly with modern eating trends. It delivers satisfaction without compromise.
Choosing Your Potatoes: The Foundation of Perfect Fries
Your journey to incredible homemade snacks begins with one crucial decision. The type of potato you select determines everything about your final results. This choice impacts texture, flavor, and cooking time significantly.

High-starch varieties create the best outcome for that desirable crunch. Low-moisture options brown beautifully and develop that signature crisp exterior. You’ll want to avoid waxy potatoes that simply won’t achieve proper texture.
Russet vs Yukon Gold: Which Potato Reigns Supreme?
Russet potatoes deliver that classic restaurant-style experience. Their high starch content creates a crispy outside with a drier, fluffier interior. These are perfect when you crave traditional texture and appearance.
Yukon Gold varieties offer a completely different experience. They provide a rich, buttery flavor with a creamier inside. These take slightly longer to crisp but reward you with exceptional taste.
Nutritional differences are minimal between these two options. A 4-ounce serving of russet fries contains approximately 135 calories. Yukon Gold versions come in at about 123 calories per same serving size.
Why Starch Content Matters for Crispy Results
Starch acts as the secret weapon for achieving perfect texture. High-starch potatoes contain less water content naturally. This allows for better browning and that satisfying crunch you love.
The cooking process transforms starch into crispy golden perfection. Lower starch varieties simply can’t achieve the same results. They remain too moist and never develop proper texture.
You’ll notice the difference immediately in your first batch. High-starch options create that ideal contrast between crispy exterior and tender interior. This makes them the superior choice for your recipe.
The Surprising Truth About Sweet Potato Fries
Sweet potatoes offer a flavorful alternative to traditional options. Their natural sugar content creates delicious caramelization during cooking. However, they require careful attention to avoid burning.
These orange-fleshed vegetables need slightly longer cooking times. Their higher moisture and sugar content change the cooking dynamic. You must monitor them closely to prevent over-browning.
Many people enjoy leaving the skin on for added fiber and nutrients. This also reduces your prep time significantly. Just ensure thorough cleaning before cutting.
Experiment with both russet and Yukon Gold to discover your preference. Each brings unique qualities to your finished dish. The fun lies in customizing your perfect snack experience.
Remember that organic or conventional growing methods don’t affect starch content. Focus on potato variety rather than origin for optimal results. Your choice truly sets the foundation for success.
Essential Ingredients for Extra Crispy & Golden Air Fryer French Fries
Great ingredients transform ordinary snacks into extraordinary experiences. Your choice of components directly impacts texture, flavor, and cooking success.
Simple, quality items create the most authentic results. You’ll discover how minimal ingredients deliver maximum satisfaction.

The Right Oil Makes All the Difference
Selecting proper cooking oil determines your final outcome. High smoke point varieties prevent burning during the high-heat process.
Avocado oil withstands temperatures up to 500°F beautifully. Refined olive oil handles 465°F while refined coconut oil works at 450°F.
These options maintain neutral flavors that won’t overpower your potatoes. They create that perfect golden finish without unpleasant aftertastes.
Avoid extra-virgin olive oil despite its popularity. Its low smoke point causes premature breakdown and bitter flavors.
You need only 1-2 tablespoons per batch. This minimal amount coats pieces evenly while drastically reducing fat content.
Seasoning Secrets for Maximum Flavor
Salt and pepper form your foundation for delicious results. These basics enhance natural potato flavors without overwhelming them.
Add seasonings just before cooking for optimal texture. Early application draws out moisture and creates sogginess.
Experiment with creative blends for personalized taste:
- Garlic powder adds savory depth
- Paprika provides subtle smokiness
- Chili powder introduces gentle heat
- Ranch seasoning delivers tangy creaminess
Toss everything in a bowl for uniform coverage. This ensures every piece receives equal flavor and browning potential.
Why Simple Ingredients Create the Best Results
Minimalist approaches yield the most satisfying outcomes. Too many additives interfere with the crisping process.
Quality potatoes, proper oil, and thoughtful seasoning work magic together. They create restaurant-quality texture with homemade authenticity.
One enthusiast perfectly captured this philosophy:
“Using just three ingredients created the crispiest results I’ve ever achieved. Sometimes less truly delivers more.”
Your investment in good components pays delicious dividends. These choices separate mediocre attempts from exceptional creations.
Remember that great snacks start with smart selections. Your attention to ingredients ensures consistent success every time.
Mastering the Cut: How to Prepare Your Potatoes Like a Pro
Your cutting technique determines whether you achieve snack perfection or disappointment. This step separates amateur attempts from professional-quality results every time.
Proper preparation ensures that golden exterior and fluffy interior you crave. Attention to detail here pays off dramatically in your final outcome.
The Ideal Thickness for Ultimate Crispiness
Cut your sticks between ¼-inch and ⅜-inch for optimal texture. Thinner slices create that satisfying crunch faster during cooking.
This thickness range allows for perfect heat penetration. You get crispy outside with tender inside in minimal time.
Thinner cuts may need just 18 minutes in your appliance. Adjust timing based on your preferred thickness for best results.
Mandoline vs Knife: Which Tool Should You Use?
A mandoline delivers precision with incredible consistency. This tool creates uniform pieces effortlessly for perfect cooking.
Use the largest setting for efficient prep work. Always wear protective gloves to prevent accidents during use.
Sharp knives work well if you have steady hands. Practice your technique to avoid uneven pieces that cook differently.
Frequent makers should consider investing in a quality mandoline. The time savings and superior outcomes justify the cost.
Why Uniform Sizes Ensure Even Cooking
Consistent sizing prevents some pieces from burning while others remain undercooked. This non-negotiable rule guarantees batch success.
Uniform cuts reduce the need for mid-cook tossing. All pieces reach golden perfection simultaneously for perfect serving.
Follow this simple process for ideal results:
- Cut off potato ends for stability during slicing
- Halve lengthwise to create manageable pieces
- Slice into even planks of consistent thickness
- Cut planks into sticks of your desired size
Testing shows that proper cutting technique reduces cooking variations significantly. Your attention here transforms novice efforts into professional-quality outcomes.
Mastering this step becomes your secret weapon for restaurant-quality snacks at home. The difference in results will astonish you immediately.
The Soaking Debate: To Soak or Not to Soak?
You’ve likely heard conflicting advice about soaking your potato sticks before cooking. This step has become one of the most debated topics in snack preparation. Let’s settle this discussion once and for all with facts.
Many recipes insist on hours-long soaking to remove starch. Research shows this isn’t necessary for achieving perfect texture. Your potato selection and cutting technique matter far more.
What the Experts Really Say About Removing Starch
Food scientists have tested various soaking methods extensively. They found minimal difference between quick rinses and prolonged soaks. Both methods effectively remove surface starch.
The key lies in understanding starch’s role. Excess surface starch can prevent proper browning. However, you don’t need extreme measures to address this.
One culinary expert summarizes the findings perfectly:
“After testing hundreds of batches, we found no meaningful difference between 30-minute and 3-hour soaks. A quick cold water rinse achieves the same starch removal in seconds.”
This revelation saves you valuable prep time. You can achieve restaurant-quality results without lengthy preparation.
The Quick Rinse Method That Saves You Time
Place your cut pieces in a colander under cold running water. Swirl them for just 15-20 seconds until water runs clear. This removes excess starch efficiently.
This method aligns perfectly with your busy schedule. It takes less than a minute but delivers excellent results. You maintain that crucial 35-minute total preparation time.
Compare this approach to traditional soaking:
| Method | Time Required | Starch Removal | Convenience |
|---|---|---|---|
| Quick Rinse | 20 seconds | Excellent | High |
| Hour-Long Soak | 60 minutes | Excellent | Low |
The quick rinse becomes your secret weapon for efficiency. It fits seamlessly into your cooking routine without compromising quality.
How Proper Drying Affects Your Final Results
Regardless of your rinsing method, thorough drying is non-negotiable. Surface moisture creates steam during cooking instead of crispiness. This sabotages your desired texture.
Pat pieces completely dry with clean kitchen towels. Press firmly to remove all visible moisture. Take an extra minute here for guaranteed success.
Water on the surface prevents proper air circulation in your appliance. It essentially steams your potato sticks rather than creating that golden crust. Complete drying ensures perfect heat transfer.
For those seeking extra crispiness, try the hot water method. Submerge pieces in hot water for 10 minutes before rinsing. This mimics the double-frying technique restaurants use.
Always remember: drying matters more than soaking duration. Your attention here makes the difference between mediocre and magnificent results.
Choose the method that fits your schedule and preferences. Both approaches deliver excellent outcomes when paired with proper drying techniques.
Seasoning and Coating Techniques for Perfect Flavor
Your flavor journey begins the moment you reach for your spice cabinet. This final preparation step transforms simple potato sticks into personalized culinary creations that rival any restaurant offering.
Proper technique here makes the difference between bland and brilliant results. You control the taste experience completely with smart choices and methods.
When to Add Seasonings for Maximum Impact
Timing proves crucial for achieving that perfect texture and flavor adherence. Add your salt and spices immediately before cooking for best results.
Early application draws out moisture from your potato pieces. This creates sogginess instead of that desirable crisp exterior.
One professional chef explains this principle perfectly:
“Seasoning at the last moment preserves surface dryness while allowing flavors to adhere during the cooking process. This simple timing adjustment elevates results dramatically.”
You’ll notice immediate improvement in your next batch. The flavors meld beautifully without compromising texture.
The Tossing Method That Ensures Even Coverage
Use a large mixing bowl for your coating process. This provides ample space for thorough and consistent seasoning distribution.
Drizzle oil first to create an adhesive base for your spices. Then add seasonings and toss vigorously until every piece shows uniform coverage.
This method prevents bland spots and ensures consistent flavor throughout your batch. You achieve restaurant-quality seasoning with homemade care.
Follow this simple process for perfect results every time:
- Place dried potato sticks in a large bowl
- Drizzle with 1 tablespoon of high-smoke-point oil
- Toss to coat all pieces evenly
- Add seasonings and toss again until uniformly distributed
This technique guarantees that each piece receives equal flavor and browning potential. Your efforts here pay delicious dividends.
Creative Seasoning Blends to Try Tonight
Move beyond basic salt and pepper to discover new taste dimensions. Your seasoning choices reflect personal preference and culinary creativity.
Experiment with these popular combinations for variety:
- Cajun blend – adds spicy warmth with paprika and cayenne
- Ranch seasoning – delivers tangy creaminess everyone loves
- Italian herbs – provides fresh Mediterranean flavors
- Parmesan truffle – creates luxurious restaurant-style taste
Start with approximately ½ teaspoon of salt per batch as your baseline. Adjust according to personal preference and other seasoning intensities.
Consider adding spices like paprika or chili powder for color and depth. These additions enhance visual appeal while contributing subtle flavor notes.
For busy evenings, keep pre-made seasoning mixes on hand. A simple blend of garlic powder, pepper, and salt works wonders when time is limited.
Well-seasoned potato sticks reduce the need for heavy dipping sauces. They stand perfectly on their own as satisfying snacks or sides.
| Seasoning Blend | Key Ingredients | Flavor Profile | Best Pairings |
|---|---|---|---|
| Cajun Spice | Paprika, garlic, cayenne, oregano | Spicy and robust | Burger nights, game day snacks |
| Ranch Style | Dill, parsley, garlic, onion powder | Creamy and tangy | Chicken dishes, veggie platters |
| Italian Herb | Basil, oregano, rosemary, thyme | Fresh and aromatic | Pasta meals, Mediterranean cuisine |
| Parmesan Truffle | Parmesan, truffle oil, black pepper | Rich and luxurious | Special occasions, dinner parties |
Remember that oil acts as an essential binder for your seasonings. Never skip this step even when using creative blends.
Your personal touch with seasonings transforms simple potato sticks into extraordinary creations. Have fun experimenting and discovering your signature flavor profile.
The Air Frying Process: Your Step-by-Step Guide to Perfection
Your cooking journey reaches its most exciting phase now. This is where preparation meets execution to create those golden delights you’ve been anticipating.
Mastering the actual cooking process separates good results from exceptional ones. You’ll discover how simple techniques deliver professional-quality outcomes every time.
Follow these proven methods to achieve that perfect texture and flavor. Your attention to detail here pays off with incredible snacks that impress everyone.
Preheating: Is It Necessary for Your Machine?
Many wonder about preheating their appliance before starting. While not always mandatory, this step can improve your final results significantly.
Preheating to 370°F for just 2-3 minutes jumpstarts the cooking process. This creates immediate crisping action when you add your potato pieces.
Check your manufacturer’s guidelines for specific recommendations. Some models work better with this quick warm-up period.
One experienced user shares this insight:
“I noticed a definite improvement in texture when I began preheating. My pieces started crisping immediately rather than steaming first.”
This small time investment often yields better browning and crunch. You’ll appreciate the difference in your finished snacks.
Single Layer vs Batch Cooking: Finding Your Method
Your arrangement method directly impacts texture and cooking efficiency. Choose between perfection-focused single layers or time-saving double layers.
Single layers deliver the ultimate crispiness you crave. Each piece receives maximum air circulation for uniform browning.
Double layers offer a practical compromise for busy cooks. You still achieve satisfying crunch while preparing larger quantities.
Never attempt triple layers as they prevent proper air flow. This leads to uneven cooking and disappointing texture.
Consider these practical comparisons:
| Method | Cooking Time | Crispiness Level | Best For |
|---|---|---|---|
| Single Layer | 18-22 minutes | Maximum | Special occasions |
| Double Layer | 20-24 minutes | Very Good | Family meals |
Your choice depends on time available and texture preferences. Both methods produce delicious results when executed properly.
Temperature and Timing Secrets for Golden Results
370°F proves to be the magic number for perfect cooking. This temperature creates ideal browning without burning.
Russet varieties typically need 18-20 minutes at this heat. Yukon Gold pieces often require 20-22 minutes for optimal texture.
Always check your progress periodically. Different machines may vary slightly in actual temperature performance.
Tossing halfway through cooking ensures even browning. This is especially helpful when using double layers.
Keep finished batches warm in a 180°F oven on a baking sheet. This maintains perfect temperature and texture until serving.
Toaster-style models may run hotter than basket versions. Reduce temperature by 20-25°F if using these compact units.
Your practice and attention create consistent excellence. Adjust times based on your specific machine and preferences.
You now possess all the knowledge for snack perfection. Your next batch will showcase your growing expertise beautifully.
Troubleshooting Common Air Fryer French Fry Problems
Even experienced cooks encounter occasional challenges when preparing this popular snack. Understanding common issues helps you achieve consistent results every time.
Most problems have simple solutions that transform disappointing outcomes into perfect creations. You’ll discover how small adjustments make significant differences in your final product.
Why Your Fries Aren’t Getting Crispy Enough
Several factors can prevent that desirable crunch from developing properly. The most common issue involves cutting your pieces too thick.
Sticks thicker than ¼-inch struggle to achieve proper texture. They require extended cooking that can lead to uneven results.
Another frequent problem involves insufficient oil application. Too little coating prevents proper browning during the cooking process.
Try these proven solutions for better outcomes:
- Cut pieces to ¼-inch thickness for optimal crisping
- Increase temperature to 400°F for enhanced browning
- Extend cooking time by 5-10 minutes as needed
- Ensure thorough drying before seasoning
One enthusiast shared their breakthrough moment:
“Reducing my cut size and increasing temperature transformed my results completely. Now I get that perfect crunch every single time.”
Remember that different potato varieties behave differently. Yukon Gold types naturally take longer to achieve crispiness than russet varieties.
How to Prevent Overcrowding and Uneven Cooking
Proper arrangement in your cooking basket determines success or failure. Overcrowding prevents hot air from circulating effectively around each piece.
This leads to steaming rather than crisping action. You end up with soft results instead of that satisfying crunch.
Always arrange your pieces in single or double layers maximum. Never stack beyond two layers as this prevents proper heat distribution.
Consider cooking in multiple smaller batches for best results. This ensures each piece receives equal attention from the circulating air.
Follow this simple arrangement guide:
| Layer Type | Air Circulation | Cooking Time | Recommended For |
|---|---|---|---|
| Single Layer | Excellent | 18-20 minutes | Perfect texture |
| Double Layer | Good | 20-24 minutes | Family meals |
| Triple Layer | Poor | Inconsistent | Not recommended |
If pieces appear pale after the recommended time, continue cooking in 1-2 minute increments. Watch closely to prevent burning during this extended period.
Adjusting Times and Temperatures for Your Specific Air Fryer
Every machine performs slightly differently based on design and power. Learning your specific unit’s characteristics ensures consistent success.
Begin with the standard 370°F temperature as your baseline. Adjust upward if browning doesn’t occur within the expected time frame.
Larger batches and certain potato varieties require modifications. Yukon Gold pieces often need 5-7 extra minutes compared to russet varieties.
Keep a simple cooking journal to track your adjustments. Note temperature, time, and results for each attempt. This helps you perfect your technique quickly.
Toaster-style models typically run hotter than basket designs. Reduce your temperature by 20-25°F when using these compact units.
Your oil choice also impacts cooking performance. Ensure you’re using high-smoke-point varieties like avocado or refined olive oil.
Stick to 1-2 tablespoons per batch for optimal results. Too little prevents browning while too much creates sogginess.
Mastering your specific machine transforms frustrating experiments into predictable perfection. You’ll soon develop intuition for exactly what each batch needs.
Remember that practice makes perfect with this cooking method. Your patience and attention to detail will reward you with incredible snacks every time.
Conclusion: Your Path to French Fry Mastery Starts Now
You now hold all the secrets to creating incredible snacks in your kitchen. From selecting the right potatoes to mastering the cooking process, each step brings you closer to perfection.
Remember that practice makes perfect with this cooking method. Your first batch might not be flawless, but each attempt improves your skills dramatically.
Share your delicious results with friends and family proudly. They’ll marvel at your ability to create restaurant-quality treats at home.
This cooking approach saves you money while delivering healthier options. You control exactly what goes into your favorite snacks without compromise.
Begin your culinary adventure tonight and discover the joy of homemade excellence. Your journey toward snack mastery awaits!